May 27, 2024 ⋅
How to boost your productivity with macOS

Four years ago, I got my first Mac. After using Windows for 15 years, macOS felt very foreign. But once I got the hang of it, I started to really appreciate the “Apple magic” that make their products so desirable. In fact, I’ve grown to like macOS so much that it’s hard to imagine switching to anything else now.
However, I’m not claiming that macOS is flawless. Frankly, I think macOS has a lot of flaws, and I keep discovering more of them all the time. Most people will probably just accept this and move on with their life. But as the nerd I am, I am constantly in search of tools, tweaks, and hacks that can improve my workflow when I sit down in front of my computer.
In the rest of this article, I’ll walk through all the settings, apps, and tweaks I use to improve my productivity in macOS. Even if you don’t care as much about your operating systems as I do, I think every seasoned Mac user will find something useful here. With that out of the way, let’s jump in!
Maximize your screen space
Typically, the best thing you can do to improve any computer experience is to get a bigger screen. The reason for this is pretty simple: the bigger the screen, the more stuff you can fit in. You can have multiple windows open at the same time, see more of your web page or document without having to scroll all the time, or work with larger canvases in creative apps.
However, if you’re anything like me, you are probably stuck with a laptop screen most of the time. Personally, I spend 90% of my computer time in front of my 13 inch MacBook. And while having a larger physical display is generally a better experience, that doesn’t mean that you can’t optimize for the screen size you actually have!
Change the macOS display settings
The best thing you can do to get more space on your screen is to change the scaling factor in the display settings. Open the Settings app and head to “Displays”, and you’ll see this interface letting you change the size of your apps and windows:
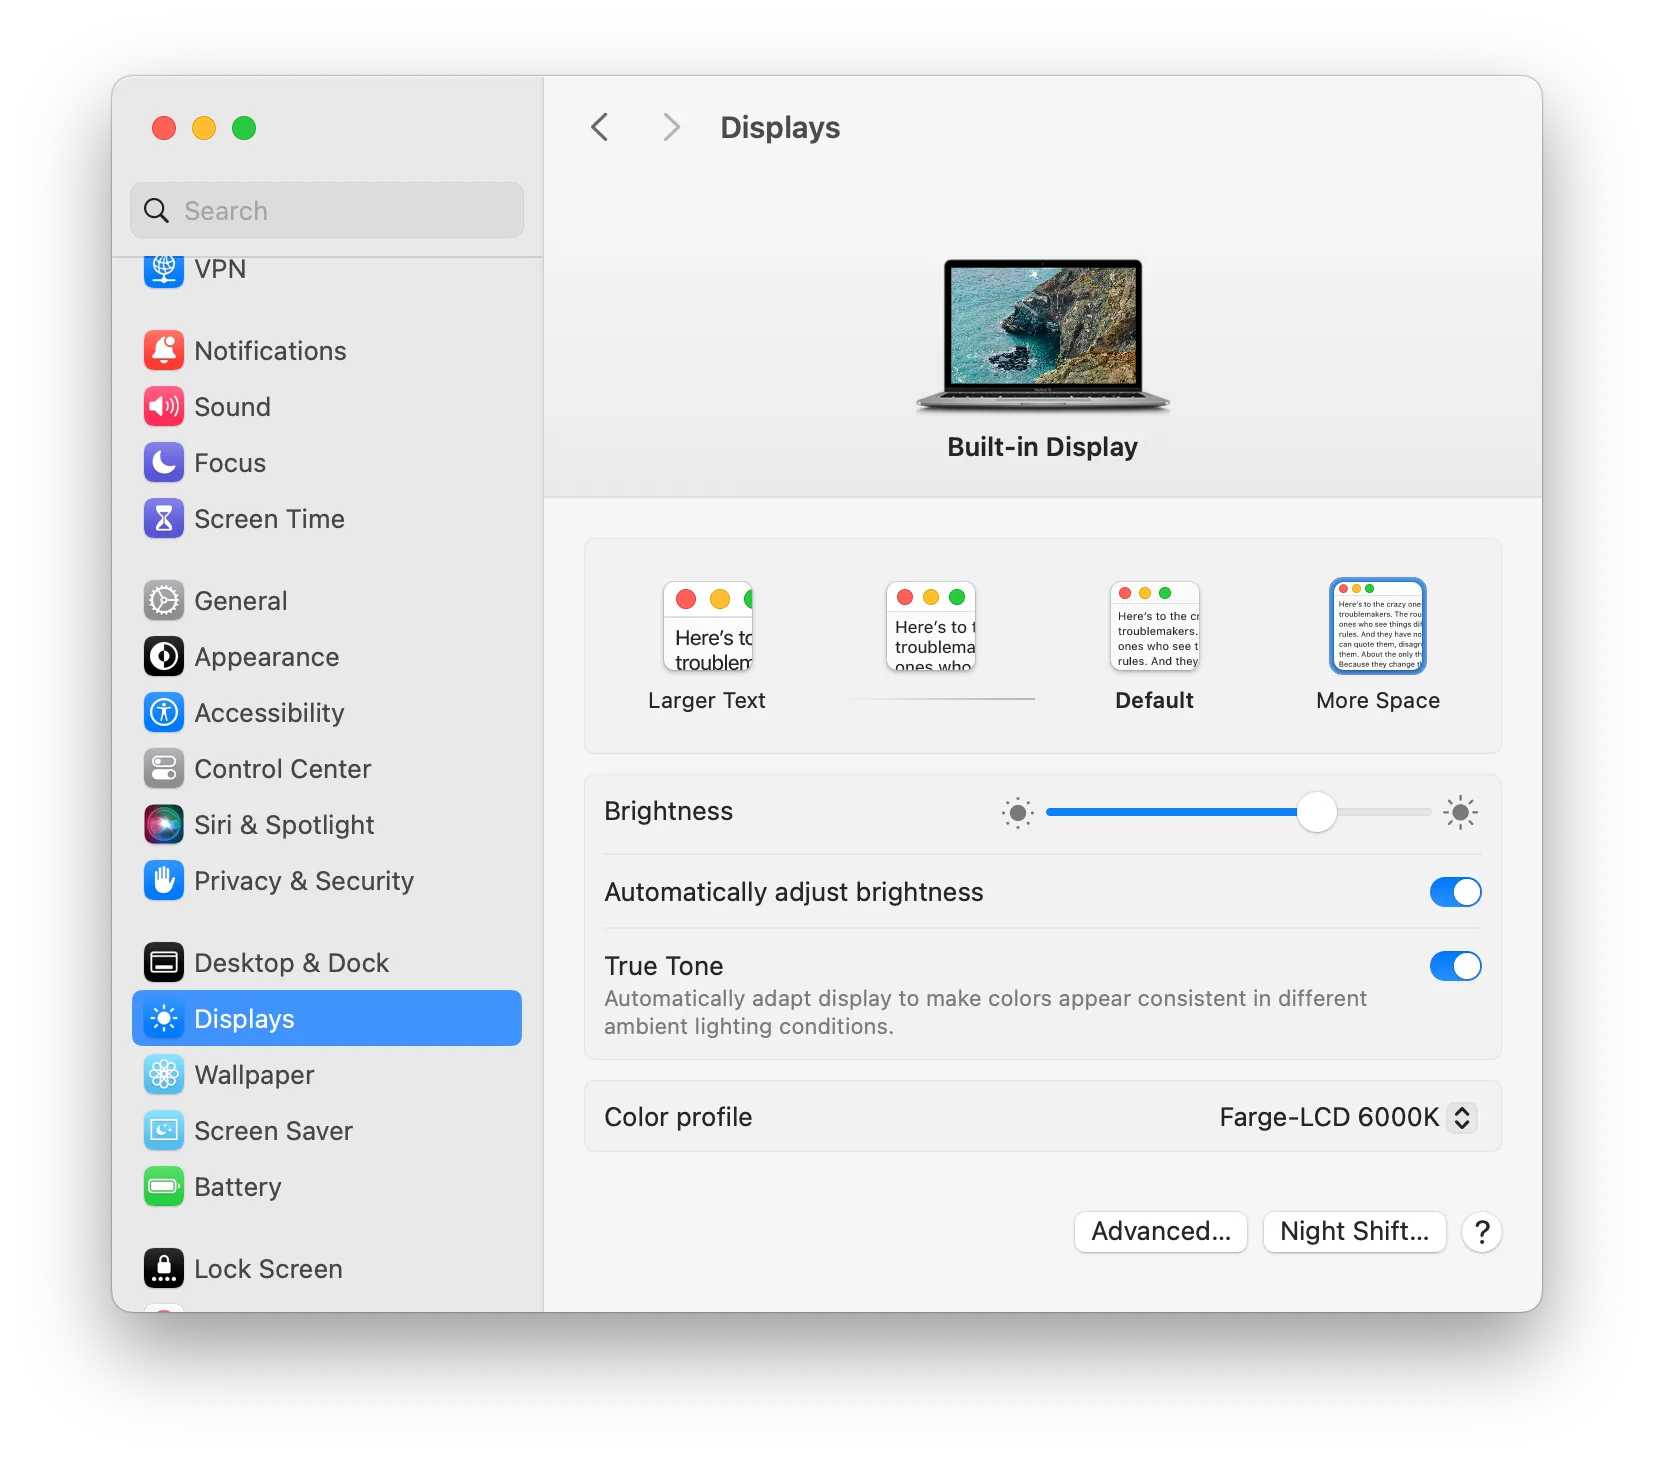
The default setting depends on when your Mac is from, but I generally find that Apple’s pre-selected option makes UI elements a bit too big, compromising how much you can fit on the screen at the same time. I personally find the option all the way to the right (typically labeled “More Space”) the best one. Granted, I have great eyesight, so it doesn’t bother me that things are a bit small. Your mileage may vary, so experiment a bit with the different options and find the one that makes the right tradeoff for you!
Hide the Dock
In case you’re unfamiliar with the terminology, the macOS Dock is the row of apps on the bottom of your screen. By default, the Dock is always there, and it’s pretty big. Depending on your display size and settings, the Dock can take up as much as 15% of your total vertical screen space. This is space that instead could be utilized by your web browser, text editor, or email app!
macOS has many settings for changing the appearance and behavior of the Dock. Firstly, I strongly recommend enabling Dock auto-hide. Head to System Settings → Desktop & Dock, and you’ll find a setting called “Automatically hide and show the Dock”. Once enabled, your dock will disappear, leaving more space for apps instead! When you actually need to use the Dock, just move your mouse to the bottom of the screen, and the Dock will slide out automatically. You might notice that this animation is kinda slow, but don’t worry: we’ll fix that in the next section.
Keep in mind that not having the Dock visible all the time will likely feel a little strange at first. I recommend giving it a shot for a week, even if you don’t like it right away. You probably won’t want to go back (especially if you use Raycast; more on that in the next section too).
Now, if auto-hide really isn’t your cup of tea, there are still other things you can do to save space. Typically, vertical screen space is more valuable than horizontal space (your screen is wider than it is tall!). Some people therefore prefer moving the Dock on the left or the right instead because of this. You can also simply make the Dock a little smaller to save some space!
Un-clutter your menu bar
If you take all my app recommendations throughout this article, you might realize that the right side of your menu bar gets a bit cluttered from everything that has to run in the background. There’s a tiny app on the App Store called Hidden Bar that efficiently cleans up this mess. Hidden Bar places a small arrow icon in the menu bar, which when clicked toggles the visibility of the menu bar icons. You can move your menu bar items by holding Cmd and dragging the icons. This lets you decide which menu bar items are visible all the time, and which ones are stowed away by Hidden Bar. Neat!
Do things faster
This section is all about how to get things done quicker whenever you sit in front of your Mac. While the actual time saved by these tips may not be game-changing, I still believe that speeding up your workflow is one of the best things you can do to your digital life. By navigating your computer quickly, you’ll feel that the operating system gets out of your way, allowing you to be fully immersed in your task. In addition, doing things quickly just feels good; it makes using your Mac more delightful.
Manage your windows efficiently
One thing I still think Windows does better than macOS is, well, windows. In my opinion, macOS has terrible window management and I wish Apple did it the Windows way instead.
Even the simple action of maximizing a window is a real chore in macOS. One way you might try for maximizing a window is to double click the top of the window. This works for some apps, but in others (such as Safari and Finder), it only maximizes the height, not the width.
If you come from Windows (or any other desktop operating system for that matter), you may also instinctively reach for the green button in the top left. This, however, puts the window into full-screen mode, which is shitty for a number of reasons:
- You can’t put other windows on top of a full-screened app. This always puts me off, as I often want to quickly look at an email or a note without completely switching away from my maximized app.
- To switch from a full-screened app to another window, you have to sit through a pretty, but incredibly slow and annoying sliding animation. And the weirdest part? This animation takes almost twice as long if you happen to use a 120hz display, such as those found on the new MacBook Pros. What?
- When full-screening an app, the menu bar disappears. A lot of macOS apps depend heavily on the menu bar, and the bar takes up so little space anyway, so this is a strange descicion in my eyes. It gets even weirder on the new MacBooks with notches, on which the part of the screen that usually shows the menu bar just turns completely black. If you’ve dug around a lot in System Preferences, you might know that there is a setting to change this behavior. However, this comes with the tradeoff that any video playing in full-screen will also have the menu bar visible. Argh!
- It gets even worse once you try to open two windows side by side. The full-screen mode supports stacking two windows vertically, but the amount of clicks, gestures, and slow animations required to achieve this is almost ridiculous. There is also no way to get more than two windows lined up next to each other in native macOS (that is, without manually dragging the borders of each window like a caveman).
Luckily, there are apps that improve the window management situation on macOS drastically. I use Magnet, which you can get for a few dollars at the macOS App Store. However, the better option today is probably Rectangle. The latter is completely free and open source, and has the exact same feature set as Magnet.
Both of these apps basically copy the window snapping that’s been included in Windows since the Vista days. But more importantly, it also gives you keyboard shortcuts for placing the window in almost any layout imaginable.
The ones I use the most frequenty is Ctrl + Option + Enter for maximizing a window, and Ctrl + Option + Arrow key to snap the window to one half of the screen. Now, opening two apps side by side is as easy as opening the first app, Ctrl + Option + Left arrow, opening the second app, and Ctrl + Option + Right arrow. This approach also avoids the full-screen mode and all its infuriating traits altogether!
Here is a screenshot of Magnet with all its layout options and keyboard shortcuts:

Get rid of slowdowns
If you took my earlier advice of enabling Dock autohide, you might notice a problem: whenever you try to access your hidden Dock, it doesn’t show up right away. This animation is infuriatingly slow: it takes a good second after your mouse touches the bottom of the screen until the Dock finally shows up in all its glory. Luckily, there is a hidden setting to change this behavior. Open the Terminal app and run this command:
defaults write com.apple.dock autohide-delay -float 0; defaults write com.apple.dock autohide-time-modifier -float 0.3; killall Dock
Now your auto-hiding Dock should be nice and snappy:
Another thing I don’t like is the “Genie” animation that runs when minimizing a window. It looks super slick, but it’s just too slow for my taste:
I much prefer the “Scale” animation, which you can enable in System Settings → Desktop & Dock. Now it looks like this instead:
Again, this might take a few days to get used to, but once you do, I can almost guarantee you won’t want to go back to Genie.
Finally, the default “key repeat” speed in macOS is way too slow. Often, I like to hold down the backspace key to quickly erase a lot of text. The key repeat speed is basically how quickly a key (like backspace) is repeated when you hold it down. I always go to System Settings → Keyboard → Key repeat rate and drag the slider all the way to the fastest option.
Raycast
If there is one thing I want you to take away from this guide, it’s Raycast. Raycast is an absolutely incredible app. At its core, you can look at it as Spotlight on steroids. If you’re unfamiliar, Spotlight is macOS’s built-in search, used for things like opening apps or finding files.
Raycast works as a drop-in replacement for Spotlight, invoked by the same Cmd + space keyboard shortcut. However, it is so much more powerful that Spotlight will ever be. The general theme here is that Raycast allows you use your mouse less and your keyboard more. Not only is this way faster than reaching for the mouse all the time, but it also doubles as being more ergonomic for your arms and shoulders. Let’s go through all the cool Raycast workflows I use on a regular basis!
Open and switch apps
Spotlight obviously works for this too, but I find Raycast to be slightly less hesitant when you start typing the name of an app. Opening and switching apps without using the mouse is just in itself a big efficiency boost. Instead of reaching for the Dock, you can just press Cmd + space, type the first two or three letters of your app, and press enter. Raycast also learns which apps you use most frequently, so the app search is likely to become even faster and more accurate over time.
Finding files
File search is in a “submenu” in Raycast. Open Raycast, type “files”, press enter, and then you can start typing the filename. To make this a little faster, I’ve set up f as a keyword for file search (you can do this in the Raycast settings). My flow for finding a file is then:
- Invoke Raycast with
Cmd + space - Type
fand press space - Search for the file and use the up/down keys to find the right one
- Press
Enterto open the file,Cmd + Enterto locate the file in a Finder window, orCmd + Kto preview it with Quick Look.
Clipboard manager
A clipboard manager is basically a history of everything you’ve pressed Cmd + C on, ever. This was an absolute game changer for me. So often, I used to find myself accidentally overwriting the clipboard with another piece of text, just to find that I badly needed the previous entry. Now, I can copy anything with the confidence that I won’t lose it.
Before I switched to Raycast, I used a separate app for this. However, Raycast’s implementation is just as good. Just search for “clipboard”, or assign it to a keyboard shortcut like Option + C.
Search menu bar items
This is an underrated one. Finding items in the menu bar can be a real chore. Often, I have no idea where the correct item is, and found myself having to dig through all the menus for ages. Raycast solves this elegantly by allowing you to search all the menu bar items. Type “menu bar” in Raycast to find this option! I use m as a keyword for this.
Really good calculator
Raycast has an incredible calculator built in. Just type your expression, and Raycast shows the result right away. You can do unit conversions, such as “20 feet to meters” or “587 USD to EUR”. You can also combine stuff, doing crazy things like “log2(300 horsepower to kilowatts) USD to GBP”. I don’t know why you’d want that, but you can if you want to :D
Text snippets
This is one of my favorites. Tired of typing your email, phone number, or address all the time? Do you frequently start your emails with a polite greeting? Do you have snippets of code that you use all the time? Raycast allows you to set up text snippets, which can be inserted through the Raycast search, an abbreviation, or a keyboard shortcut. For instance, I’ve set up the “gml” abbreviation for my Gmail address. Whenever I type “gml” and press Enter, my annoyingly long email address is inserted using just four keyboard strokes!
Search emoji
The built-in macOS emoji picker sucks. The Raycast one is way better. Simply search for “emoji” in Raycast, or set a keyword or shortcut in the settings (I use em)!
Search special characters
Pretty much the same as the emoji picker, but for special characters! No more digging around Google trying to find the correct Unicode character. My keyword for this is ch.
Floating notes
A floating note is like a digital post-it note. Just search for “float”, and a small text window appears above your other apps. Also doubles as a really quick way of counting the number of words or characters in a piece of text.
And much, much more
The coolest part about Raycast is that anyone can write extensions for it and publish them to the Store. This is a community effort, and it lets you use Raycast for all sorts of crazy things. Here are some of the ones I use:
- Apple Music: lets me search for songs, albums, or playlists and start playing them without ever opening the Apple Music app. There is a similar extension for Spotify too.
- ChatGPT: Quick access to a ChatGPT interface straight from Raycast. Fantastic for looking stuff up without leaving the current app.
- Craft: Quickly search for notes in Craft, my note-taking app of choice. Notion also has an extension like this.
- Speed Test: Run an internet speed test without opening a web browser!
Fix your mouse
Even if you use Raycast and know your keyboard shortcuts well, you’ll probably still use a mouse or a trackpad quite a bit. While the Mac trackpads are unmatched, the mouse experience leaves a lot to be desired (that is, unless you use the quirky Magic Mouse that Apple still sells for $100). In particular, the scrolling algorithm is absolutely atrocious. Not only does the wheel scroll the wrong way (and you can’t change it without also reversing the trackpad scrolling direction), but it is super choppy and has an unpredictable acceleration curve.
Again, third party software saves the day. I have tried pretty much all of them, and let me spare you the time: BetterMouse is the best of the bunch. It has an insane amount of customization options that should do the trick for any mouse. It even lets me fully utilize all the buttons and gestures on my Logitech MX Master, without relying on custom Logitech software. BetterMouse costs a few dollars, but in my view it is highly worth it if you use a third party mouse together with your Mac.
Fix Finder
Finder, macOS’s file explorer, is pretty good. However, as with many other things in macOS, the default options suck. If you open a Finder window on a brand new macOS installation, you might notice how hard it is to find the folder you want, or even know which folder you are currently in! Let’s go through some settings you should change to make Finder more useful.
Modify the sidebar
As default, the Finder sidebar is quite useless. Apple puts a few folders in there, such as Documents, Desktop, Applications, and Downloads. There is also a bunch of tags (I’ve never heard of anyone who relies on tags for their file organization). But let’s say you want to navigate to your user folder. How would you even do that?
Let’s add some more things to the sidebar. Press Cmd + , to open the Finder settings (by the way, this is a super useful shortcut to know, as it opens the settings window of pretty much any application on macOS). Then, navigate to the Sidebar tab.
- Under Favorites, I always like to have my user folder. Tick the box that has a home icon with your username next to it. I also got rid of “Movies”, “Pictures”, and “Music”, as I never use those folders at all.
- Under Locations, I have all the boxes ticked. First of all, this makes it easy to navigate from the root directory of your internal drive. Also, whenever you plug something in (flash drives, CD readers, external SSDs etc.), it will show up in the sidebar immediately, which is convenient.
- Under Tags, I just untick all of them. I never use tags and they take up unnecessary space.
Show the Path Bar
Another annoying default is that whenever you have a folder open in Finder, there is no easy way to know where that folder actually is located in the file system. Luckily, this is easily fixed by showing the Path Bar. In the menu bar, just go to View → Show Path Bar. Now, you get a permanent bar on the bottom of the Finder window that shows the entire path to the folder you’re in. You can also click on any part of the path to navigate out to that folder, or right-click to copy the full path name.
Change the default view settings
This one is admittedly a bit opinionated, but I think the default view in Finder is pretty maddening. First of all there is no sensible ordering of the items, and there is no clear separation between files and folders. Secondly, the items don’t stick to their grid. If you, for instance, delete a file, it leaves a gap in the grid instead of filling it with another item:
We can fix this by tweaking the view options. Press Cmd + J in any Finder window to open these options, and find the drop-down called “Sort by”. Set this to “Kind”. Then, click “Use as Defaults” on the bottom of the options window. Not only does this enable a fixed grid that is much easier to navigate in, it also neatly places the folders first, and then the files grouped by file type after that:
Rounding off
I want to end by mentioning a few quick-fire macOS tips and tricks that you might find useful.
- You might have used macOS’s screenshot tools, invoked by
Cmd + Shift + 3,Cmd + Shift + 4, orCmd + Shift + 5. However, a less-known trick is that if you also hold theControlkey while taking the screenshot, the image is copied to the clipboard instead of saving it as a file. - You can change the feel of the trackpad clicks on all modern MacBooks. Go to System Settings → Trackpad → Click to change it. I prefer the lightest setting, as it feels like less of a strain on my hands and wrists.
- Pressing
Cmd + ,opens the settings window in almost any macOS app. - Holding
Option + Shiftwhile pressing the volume or brightness keys lets you adjust them in quarter increments.
That’s it! If you know any more macOS productivity hacks that you think should be mentioned here, feel free to shoot me an email at [email protected]!